Sending Participants Emails from your own Domain
One of the benefits of StageClip Producer is built-in notifications to your students about when their clip is ready to view and share. If you're doing a virtual or hybrid event with us, emails will also be sent to invite students to participate by uploading content. So it is vital that these emails reach your students.
Emails can be sent from the StageClip domain, noreply@mail.stageclip.com, or from your own institutions domain. Sending from your own domain will mean that emails appear to be coming directly from the school, rather than from StageClip. In either case, there are a few steps required to coordinate with your IT department and ensure that the emails reach your students
Sending from your own Domain
1. Navigate to the Analytics section of Producer by using the left side menu
2. Select the Domains tab at the top of the page
3. Click on the ‘Add Domain’ button

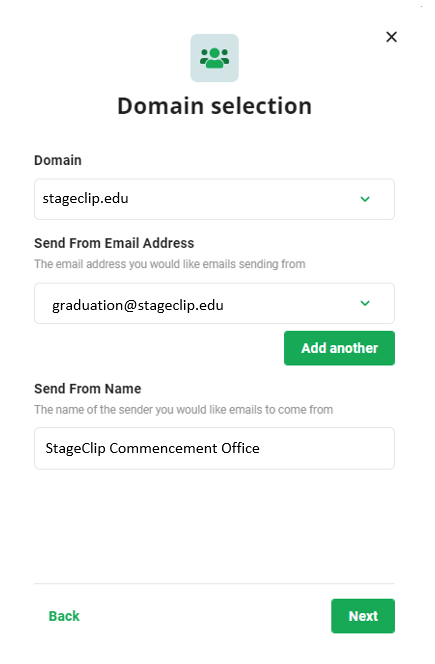
4. Add the following information:
- Send from domain – the domain of the institution. For example, "stageclip.edu"
- The Name and Email of IT department for your institution – this person will receive an email with instructions for adding the DNS records to your email server
- Send from Email Address and Name – this is the email address and name the emails to the students will come from. For example, "StageClip Commencement Office" & "graduation@stageclip.edu"
5. The name and email you input for the IT department will receive an email with instructions to add DNS records to their email server. This is very important as it will allow emails to be sent by us on your behalf. The email asks that they send an email to clientsupport@stageclip.com to also notify StageClip when the request is complete

6. Once it has been confirmed that the DNS records have been added, you can check in the Domains tab. You’ll see that the domain status has changed to Validated once it is successfully verified.

7. To set up emails with this new domain, navigate to your event and click on the Emails tab at the top of the page
8. Select the Email Settings button on the right side of the page, and then choose Send emails from my institutions domain from the pop up menu. Click on Confirm at the bottom of the pop up.

 10. Confirm that the Sender Name and email are correct and click Confirm. Your domain setup is now complete for this event . To duplicate the domain setup for additional events, please see this article on Cloning Event Setup.
Note for IT departments: If you've added the DNS record as instructed and we're still having trouble verifying your domain, please remove your domain name from the hostname field provided in the email and we'll try again. E.g. scph0523._domainkey.stageclip.com becomes scph0523._domainkey